


Create a Digital Link
Create a Digital Link opens the generator. It has two halves: the GS1 data that gives the code its identity, and the QR code settings that give it a name, a destination and an appearance. A live preview sits beside them and refuses to produce a code until both halves validate.
GS1 configuration
This is the part that makes the code a Digital Link rather than a QR code that happens to hold a URL.
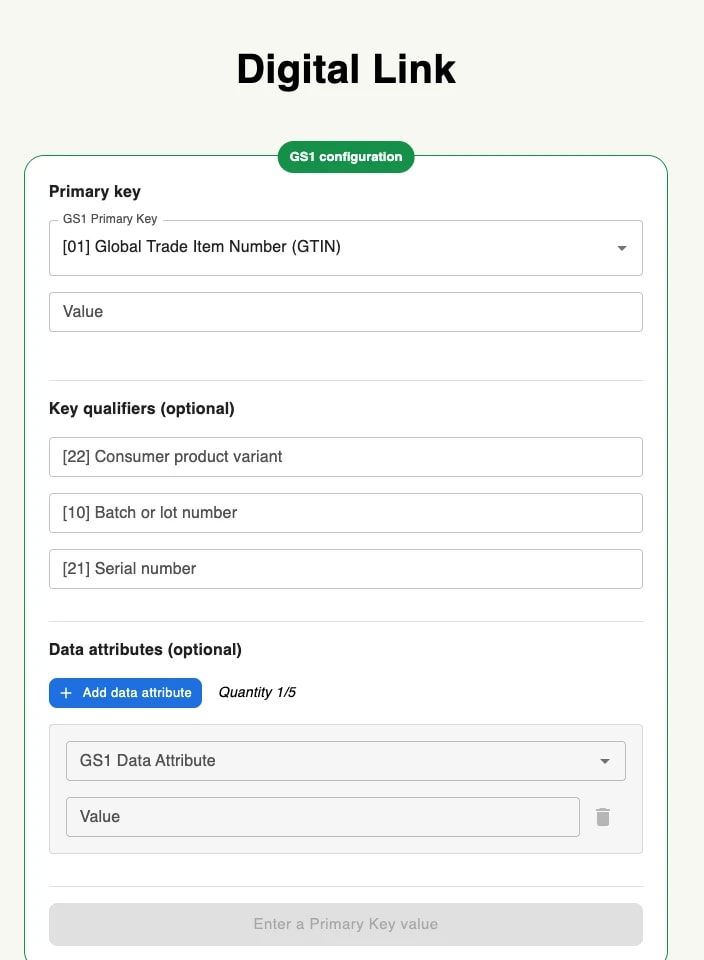
Primary key
The primary key identifies what the code is on. In almost every case it is Dans presque tous les cas il s'agit de — the number already on the pack's barcode — and its value goes in the field beneath.
The bracketed numbers are GS1 application identifiers, the same ones used in barcodes. They are shown rather than hidden because they are what appears in the generated URL, and what a scanner reads back out of it.
Key qualifiers
Qualifiers narrow the identity from a product to a particular instance of it. Three are available, and all are optional:
[22] Consumer product variant: a variant of the same GTIN — a different formulation or presentation.
[10] Batch or lot number: the production batch, which is what a recall is expressed in.
[21] Serial number: a single unit, which is what makes anti-counterfeiting and warranty checks possible.
Add a qualifier only if the printed code will genuinely be specific to it. A serialised code has to be printed per unit; a batch code has to be printed per batch. Each one you add narrows what the same artwork can cover.
Data attributes
Data attributes carry additional GS1 data in the URL — an expiry date, a net weight, and so on. Add data attribute adds one, up to five, and the counter beside the button shows how many you have used.
Attributes are optional and they lengthen the URL, which makes the QR code denser. Add what a scanning system will actually read.
QR Code settings
The second card is the QR code itself:
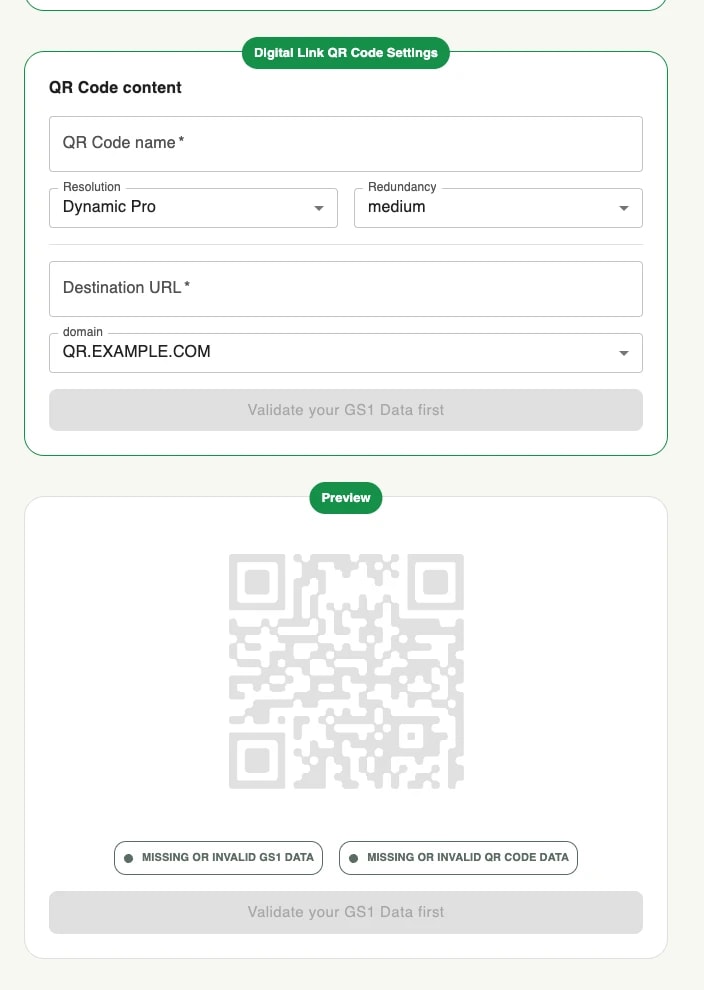
QR Code name: how the code appears in your list. It is for you, not for the scanner.
Resolution: Dynamic Pro. A Digital Link code resolves through Unitag, which is what lets its destination and its link types change after printing.
Redundancy: the error-correction level. Higher redundancy survives more damage and dirt but makes the pattern denser; medium suits most printed packaging.
Destination URL: where a plain scan goes when nothing more specific is asked for.
domain: the domain the code resolves through. A branded domain registered on the account can be selected here, so the address on the pack is yours.
Preview and validation
The preview panel shows the code as it will be generated, with two validation chips beneath it — one for the GS1 data, one for the QR code data. Both have to clear before the code can be created; until they do, the button reads Validate your GS1 Data first.
Validating early is worth the click. A GS1 identifier that is wrong is not a cosmetic problem: the URL encodes it, and a printed run cannot be corrected.