

Create a new batch
to create lots of QR codes at once!
Generating numerous QR codes runs thanks to an excel file. To avoid complex edition process and errors, Unitag lets you use templates in order to create batches.
Create a batch
It all starts from the Atlas page: click , top right. The wizard runs in three steps.
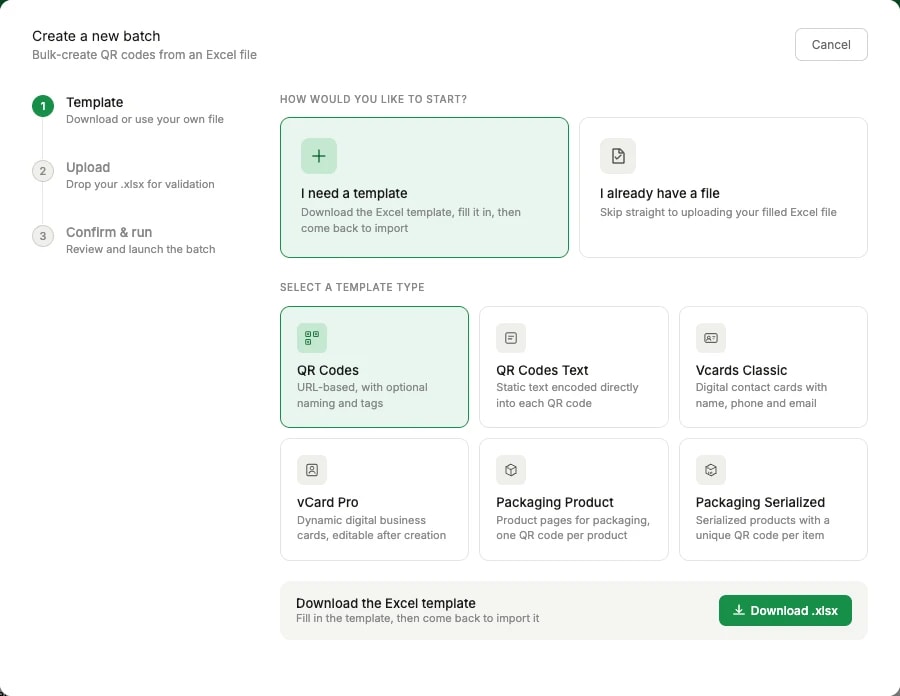
Template: pick I need a template if you are starting from nothing, or I already have a file if yours is already filled in. Choose the template type, then click Download .xlsx.
Upload: fill the spreadsheet in, come back, and drop the .xlsx into the wizard. Atlas validates the file before anything is generated, so a mistake in it surfaces here rather than halfway through the batch.
Confirm & run: check the summary of what the file will produce, then launch the batch.
All QR codes generated this way will be found on your QR codes app, inside of the QR codes list page.
The batch list
Back on the Atlas page, every batch you have launched is listed with what became of it.
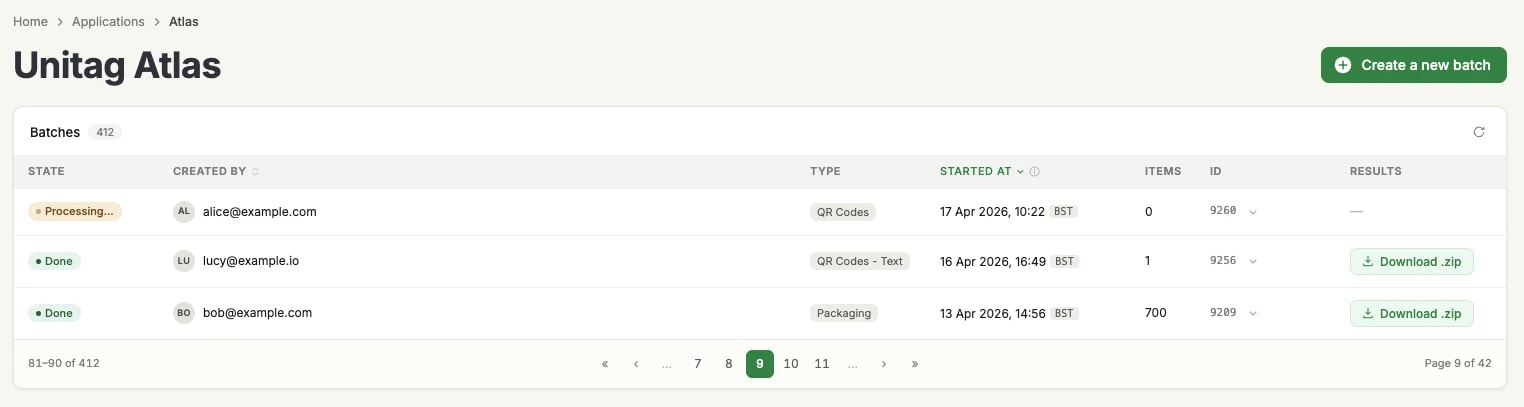
State: Processing while the batch runs, Done once it has finished.
Created by and Started at: who launched the batch, and when.
Type and Items: the template the batch was built from, and how many assets it produced.
Results: Download .zip appears once the batch is done, and holds the generated files.
The refresh icon at the top right of the panel re-reads the states, which is what you want while a long batch is still processing.
Atlas templates
You'll have multiple choices for filling your Atlas Template, even if you'll have to fill the fields regarding QR codes 'macros' first. You'll be able to manage designs with the template as well.
However, we recommend creating a QR code template first in order to use it within your Atlas template to make all QR codes match the same visual entity by indicating your QR code template in the right column (see below).
How to create a QR code template ?
A guide to Atlas templates
An Atlas template is composed by three parts:
1. The Data part contains everything your QR code needs to work properly.

Label : A label for your QR code. Is equivalent to naming it in the generator.
Destination URL : Destination (or content) of your QR code. Users will be redirected to it.
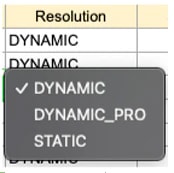
Resolution : QR code type (dynamic, dynamic pro, static) to use during the import. Depends on your plan.
Short URL : Allows to change short URLs.
Domain : If a domain name has been registered in the unitag console, you'll be able to use custom domain names in your short URLs.
Campaign and Sub Campaign : Can be bind to campaigns and sub-campaigns names to directly give your assets a Campaign.
2. The Design part will help you use a QR code template for generation, or manually edit future designs.

Template ID : If wanted, will contain the QR code template ID.
Type : Type of color to use for the QR code (prefilled with Single Color, Gradient or Image as Color).
Primary Color : Hex code of the main color (ex: #afc928).
Secondary Color : Hex code of the secondary color (gradient only - ex: #afc928).
Gradient Type: Prefilled field about the gradient type, only useful if Gradient has been selected in the Type column.
Overlay Image URL: Pasting a public image URL in this field will use it as a mask top of your QR code instead of a color or gradient. Only useful when Image as Color has been selected in the Types column.
Brightness : Adjust QR code brightness.
Contrast : Adjust QR code contrast.
Modules : Choose a Modules Style for your QR code. Multiple choices avaliable, same terminology as in the generator.
Eyes : Choose a Eyes Style for your QR code. Multiple choices avaliable, same terminology as in the generator.
Logo Image URL: Pasting a public image URL in this field will use it as a centered logo in the middle of your QR code.
3. The Unitag part is a small section of prefilled lines. This does not need to be edited, for it will only serves Unitag services once the template has been imported.